Size, Position, and Spacing
Width and Height
The first thing we probably want to do is to set the width and height of an element.
We'll do that with the width and height attributes. Since these properties affect layout and positioning of things on the page, they're not set in our stylesheet, but only in our view.
-- An el with width and height set

el MyStyle [ width (px 200), height (px 200) ] (text "hello!")
Width and height both accept a Length as their value. A Length can be any of the following values:
- px - An exact pixel value.
- percent - The percent of available space within the parent element.
- fill - Fill will divide up the remaining available space between the elements.
- So, if you had two elements, each with
width fill, then they'd both split the available space evenly.
- So, if you had two elements, each with
- fillPortion Int If you don't want elements to split up the available space evenly, you can manually specify the portion they should take using fillPortion.
- For example, if you had one element that had
width filland one withwidth (fillPortion 2), then the second element would take twice the amount of available space as the first element.
- For example, if you had one element that had
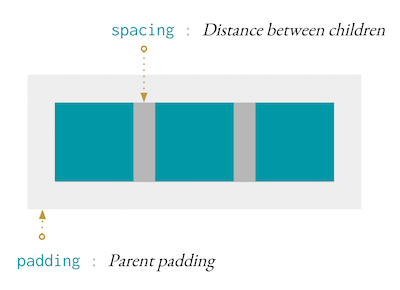
Spacing and Padding
There's no concept of margin in style-elements.
Instead we have padding and spacing. Padding is what you'd expect, and spacing is the space between children.
So, if we have the following row, with some padding and spacing set, here's an image of what we can expect.
row MyRowStyle [ padding 10, spacing 7 ]
    [ el MyStyle [] empty
    , el MyStyle [] empty
    , el MyStyle [] empty
    ]
Where are the units?!
Unlike width and height, most attributes and properties in style-elements actually only allow one unit, which is pixels.
This makes it really easy to think about your layout and exactly what's happening with it.
There's also paddingXY, paddingTop, paddingBottom, paddingLeft, paddingRight, and spacingXY if you want more control.
Alignment
We also have alignment attributes like: center, alignLeft, alignRight, verticalCenter, alignTop, alignBottom, and justify.
If we apply the alignment attributes to a layout element like row or column, then that alignment will apply to the children of that element. When we apply these alignment attributes to an el, they will align that el. This makes it easy to set a general layout and then override individual elements if we need to.
So, here's a row where we align everything to the right.
row MyRowStyle [ spacing 5, padding 5, alignRight, width fill ]
    [ el MyStyle [] empty
    , el MyStyle [] empty
    , el MyStyle [] empty
    ]

Then we can adjust elements indivudually. Let's take the first box and align it to the bottom.
row MyRowStyle [ spacing 5, padding 5, alignRight, width fill, height (px 200) ]
    [ el MyStyle [ alignBottom ] empty
    , el MyStyle [] empty
    , el MyStyle [] empty
    ]

Adjusting the Position
If we need to go even farther with adjusting the position of an element, we can use moveUp, moveRight, moveLeft and moveDown.
They work like you'd expect, and of course, the only allowed values are pixels.
el MyStyle [ moveUp 50 ] empty